To edit text in an image in Photoshop, you remove the old words, type the new ones with the Type tool, and then match the font, color, angle and grain by hand. In a flat JPG or PNG the letters are pixels, not live text, so you can't click into them and retype. This guide takes you through six steps, from the open image to a finished PNG, and names the trade-offs at each one. If you would rather skip the manual work, an AI tool can edit text in an image by detecting the words and redrawing them in the original style. We say when that is quicker and when Photoshop is still the better choice.
Before you start: live text or flat pixels
The file you have decides how much work is ahead.
- You have the layered file. If the image came from a Photoshop document, open it and use the Type tool on the text layer. Adobe's help explains how to edit text in Photoshop. You can skip the rest of this guide.
- You only have a flat image. A JPG, PNG, screenshot or scan is a raster graphic. The letters are merged into the picture, so you erase them and set new type on top.
Photoshop is also a paid subscription. As of October 2026, Adobe's Photoshop page lists the Photoshop plan at US$22.99 a month on an annual plan billed monthly. Some of its generative features need an internet connection, which matters for step 3.
Step 1: Open the image and protect the original
- Choose File > Open and pick your image.
- Leave the image layer untouched. Where a tool allows it, put each fix on its own new layer (Layer > New > Layer), so you can undo one repair without losing the others and switch the fixes off to compare with the original.
- Save a layered PSD early, and keep the untouched original file somewhere safe.
Step 2: Identify the font and sample the color
Collect what you need before you erase anything.
- Match the font. Choose the Rectangular Marquee tool, drag a tight box around the words, then choose Type > Match Font. Photoshop lists similar fonts. Adobe's Match Font help says it uses machine learning to compare the text with licensed fonts on your computer and on Adobe Fonts. It also says two or three lines of text give better results than one, and that the box should be cropped closely to the left and right edges of the text.
- Sample the text color. Choose the Eyedropper tool and click the middle of a thick part of a letter. Then click the foreground color and copy its hex code, so you can enter the same color later.
- Note the angle and size. Zoom in and check whether the baseline is level or slanted, and how tall the capital letters are.
Match Font suggests similar fonts, and it doesn't always find an exact one. Hand-drawn, custom and heavily styled lettering often has no close match. For other ways to find a font, see how to identify a font from an image.
Step 3: Remove the old words
Choose the method by what sits behind the letters.
| Method | Use it when | What to know |
|---|---|---|
| Brush with a sampled color | The background is flat and solid | Sample the background with the Eyedropper, then paint over the words on a new layer. Gradients and grain will show the patch. |
| Remove tool | The words sit over a photo or a gradient | Brush over the words. The options bar lets you set generative AI to on, off or auto. |
| Content-Aware Fill | The area is larger, or the texture repeats | Select the words, then choose Edit > Content-Aware Fill and review the sampling area. |
| Generative Fill | The other tools leave smears or repeats | Needs an internet connection and uses one generative credit for each generation. |
| Clone Stamp or Healing Brush | The background is a pattern such as brick, fabric or wood grain | Alt-click (Option-click on a Mac) to set the source, then paint over the words. |
How to use the Remove tool
- Add a blank layer above the image.
- Choose the Remove tool in the toolbar. If you can't see it, press and hold the Spot Healing Brush to show the related tools.
- In the options bar, turn on Sample All Layers, so the tool reads the picture below while you work on the blank layer. Set the brush size a little larger than the letters.
- Brush over the words and release. Photoshop fills the area from its surroundings. Adobe's help suggests several strokes for large or complicated areas, so work along a long line in short passes.
- Zoom to 100% and look for leftovers: ghost outlines, smears and repeated patterns. Undo and try smaller strokes, or switch to another method in the table.
The options are listed on Adobe's pages for the Remove tool and Content-Aware Fill. For Content-Aware Fill, Adobe describes sampling areas called Auto, Rectangular and Custom, and output to the current layer, a new layer or a duplicate layer. Choose a new layer so the repair stays separate.
For Generative Fill, Adobe's generative AI FAQ says you must be connected to the internet, and that each generation uses one generative credit. The result appears on a new layer, and you can pick one of the variations. According to Adobe's Generative Fill page, you can leave the prompt blank and Photoshop fills the selection from the surrounding picture.
Use these tools only on images you own or have permission to change, and leave watermarks, credits and copyright notices in place.
Step 4: Type the new words
- Choose the Horizontal Type tool (T). Click once on the image to start a short line, or drag a box for a paragraph.
- Type the new words. In the options bar, set the font, size and color. To reuse the old color, click the color swatch and enter the hex code from step 2.
- Open Window > Character to adjust the spacing. Tracking changes the space across a whole line, and kerning changes the space between one pair of letters. Adjust both until the new words fill about the same width as the old ones.
- Confirm the text with the check mark in the options bar, or press Ctrl+Enter (Command+Return on a Mac).
- Switch your fix layers off and on to compare with the original, and move the text until the baselines line up.
Adobe's page on adding text covers point text and paragraph text in more detail.
Step 5: Match the angle, softness and grain
New type looks pasted on when it is sharper, cleaner or straighter than the picture around it.
- Angle and perspective. Choose Edit > Free Transform (Ctrl+T, or Command+T on a Mac) to scale and rotate. The Edit > Transform menu also has Skew, Distort, Perspective and Warp. If a command is greyed out, rasterize the type layer once the spelling is final, then try again.
- Softness. If the old letters were soft, convert the layer to a Smart Object (right-click the layer, then choose Convert to Smart Object) and add a very small Filter > Blur > Gaussian Blur.
- Grain. Add Filter > Noise > Add Noise in small steps until the letters carry the same grain as the photo. On a Smart Object these filters become Smart Filters, which you can change or remove later, as Adobe explains in Apply Smart Filters.
- Lighting. If the old letters had a shadow or glow, rebuild it with Layer > Layer Style.
Step 6: Check the result and export
- Zoom to 100% and 200%, and read every letter against the words you meant to type.
- Look around the words for smears, hard edges or a visible patch, and compare with the original by switching your fix layers off and on.
- Save the layered PSD, so you can change the text again later.
- Choose File > Export > Export As, pick PNG or JPG, and export. This makes a copy and leaves the PSD as it is. Adobe lists the format settings in its Export As help.
Where Photoshop gets hard
- Fonts. Match Font finds similar fonts. Hand lettering, 3D lettering and custom brand type may not exist as a font at all, so you redraw the letters or settle for a near match.
- Texture and light. Letters over rock, fabric or a gradient need several tools and checks, and each repair can show.
- Many edits. Every extra line, version or language repeats steps 2 to 5.
- Cost and skill. Photoshop is subscription software with a learning curve, and some of its generative tools need an internet connection and use generative credits.
Photoshop is still the better choice when you need exact brand typography, print-ready files, layered deliverables or control over every pixel.
When an AI text tool is faster
An AI text tool replaces steps 2 to 5 with one pass, so it usually means fewer steps when the lettering is stylized, curved or sits on texture. EditText.ai works like this:
- Upload a PNG, JPG or WebP image up to 14 MiB. The text is detected automatically and listed line by line.
- Type the new words beside each line you want to change, and leave the other lines as they are.
- Choose Standard or High quality, then apply the change.
- Compare the result with the original at full size, then download the PNG.
There is no font to pick, because the image itself guides the lettering. That makes it a good fit when you want to edit text in an image with the same font or edit text without changing the background.
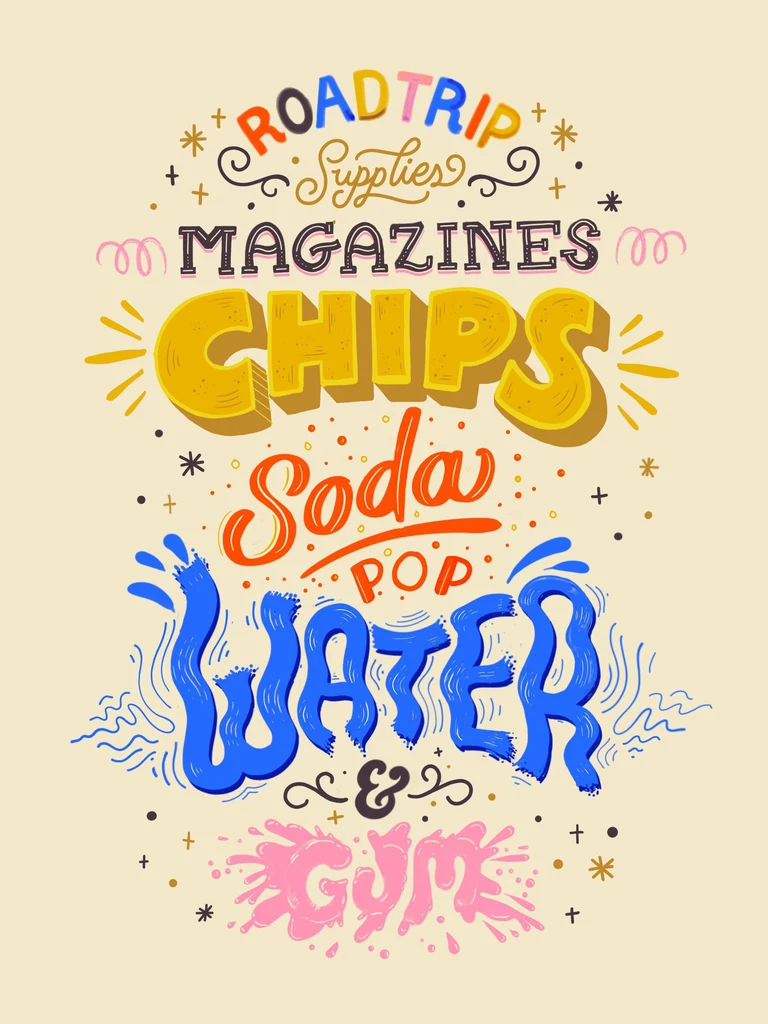
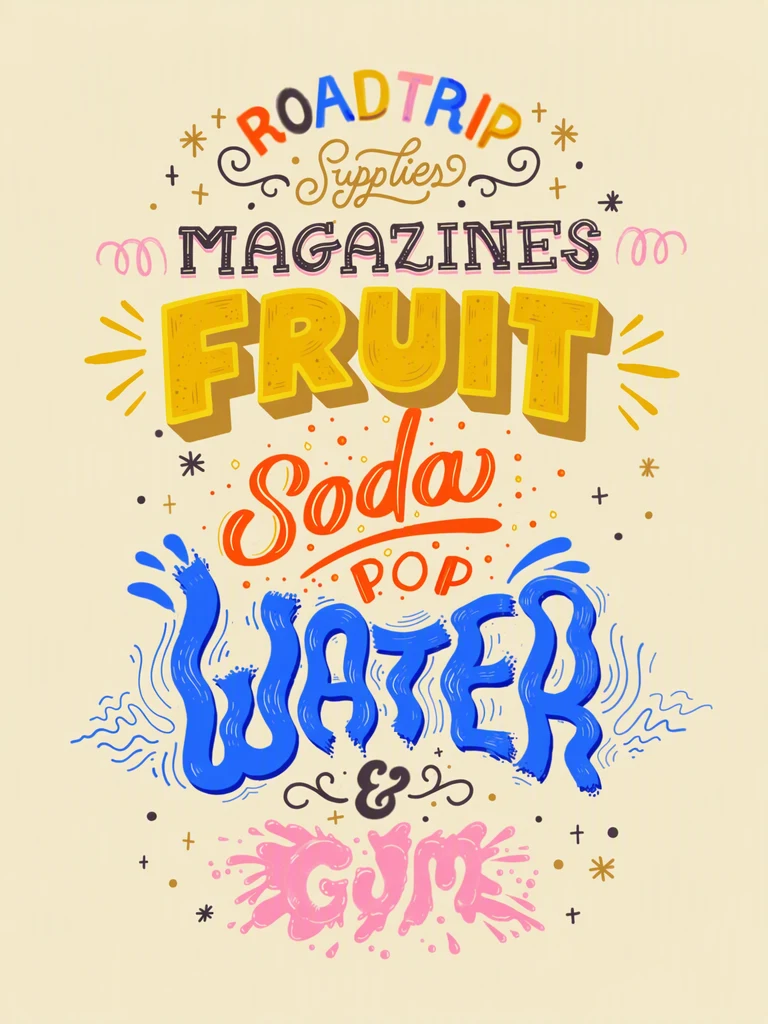
Before and after: CHIPS changed to FRUIT (from the EditText.ai examples). Hand-drawn lettering like this is unlikely to match an installed font, so a manual edit would mean redrawing the shape, the shadow and the hatching.
Standard uses 1 credit and High quality uses 2 credits at 1K. Paid plans can also edit in 2K or 4K, where Standard uses 2 or 3 credits and High quality 5 or 7. You get one free Standard edit, which carries a watermark. Plans cost $9, $29 or $49 a month for 10, 35 or 60 credits, as listed on the pricing page.
Results can vary, especially with unusual lettering or detailed backgrounds, so check the finished image at full size. You can't choose a font. If you have the source file and need exact brand typography, edit the source file instead. You can also open the downloaded PNG in Photoshop to fix small details.
Which route should you choose?
- You have the PSD: edit the live text layer.
- You need print-ready or brand-exact type: use Photoshop.
- The lettering is stylized, textured or spread over many lines: try an AI text tool first.
- You want a free manual tool: read how to edit text in an image in Photopea.
- You need the words in another language: translate text in an image.
- You only need the words gone: remove text from an image.
For a wider look at every method, including phone apps and Canva, see how to edit text in an image.
Edit the words with AI
If you would rather not rebuild the lettering by hand, upload your picture to edit text in an image and compare the result with the original. Only edit images you own or have permission to change, don't erase watermarks or credits, and don't alter documents or screenshots to mislead anyone.
Frequently asked questions
Can I edit text in a JPG in Photoshop?
Yes, but the words in a JPG are pixels, not live text. You remove the old words with a tool such as the Remove tool or Content-Aware Fill, then type new words with the Type tool and match the font, color and angle. If the JPG came from a Photoshop file, open that file instead and edit the text layer.
How do I find the font of text in an image in Photoshop?
Select the words with the Rectangular Marquee tool, then choose Type > Match Font. Photoshop lists similar fonts, including ones from Adobe Fonts that you can add. It suggests close matches, not always exact ones, and custom lettering may have none.
Can Generative Fill change the words in an image?
Adobe describes Generative Fill as adding and removing content in a selection from a text prompt. It can clear old words, but image generators often misspell new ones, so type the final words with the Type tool. Our post on why AI image generators can't spell explains the reason.
Why can't I select the text in my image in Photoshop?
Because in a flat image it isn't text. The letters were merged into the pixels when the image was exported, so Photoshop sees colored dots. Open the layered source file if you have it, or rebuild the words as described above.
Is there a free alternative to Photoshop for this?
Photopea is a free editor that runs in your browser and uses similar tools, and our guide to editing text in Photopea covers the same job. An AI text tool such as EditText.ai also gives you one free trial edit, with a watermark.