To hide personal information in a screenshot, crop out everything you don't need, then cover the details that remain with a solid, fully opaque shape, not a see-through highlighter or a light blur. For a tidier look, you can remove text from a screenshot so the words are gone and the background is rebuilt. Either way, save the result as a new copy and zoom in to check it before you share.
What to look for before you share
Before you post a screenshot in a bug report, a help forum, a tutorial or a portfolio, scan the whole image for:
- Names. To hide your name in a screenshot, check account menus, profile headers, document titles and "signed in as" labels.
- Email addresses and phone numbers in settings pages, account screens and form fields.
- Home or delivery addresses in maps, address settings and autofill suggestions.
- Profile photos and avatars.
- Usernames, account IDs and device names in settings pages, bug reports and error messages.
- Notification previews that appear at the top of the screen while you capture.
- Browser tabs, bookmarks and the address bar, which can show the sites you use and the accounts you're signed in to.
- Calendar entries and reminders in widgets or sidebars.
- File paths and window titles that include your account name.
- QR codes and barcodes, which can hold links or account details that a phone can read.
- Location details, such as a map showing where you are or a weather widget that names your town.
Other people's details count too, such as a colleague's name or photo in a shared document or a team settings page.
Methods ranked from safest to weakest
| Method | How safe | Why | Use it for |
|---|---|---|---|
| Crop | Safest | The detail is no longer in the new image | Anything you don't need |
| Solid, opaque box | Very safe | Covers the pixels completely once the image is saved | Details in the middle of the screen |
| Clean removal | Safe for the final image | The text is replaced with rebuilt background | Tutorials, documentation and mockups |
| Blur or pixelation | Weak | Some of the original can remain, so short text may be guessed | Not for text |
| See-through highlighter | Unsafe | The text underneath often stays readable | Never for hiding details |
Use a solid box for what's left after cropping. A filled rectangle at full opacity replaces the pixels under it once the screenshot is saved as a flat image. Make sure the shape is filled, not just outlined. Documents are different: Wikipedia's article on redaction notes that black boxes drawn over text in a PDF or word processor file can be deleted to reveal the text underneath. Share the screenshot itself, not a document with boxes on top.
Don't rely on blur, pixelation or highlighters. Blur and pixelation keep some information about what was underneath. With short, predictable text such as a phone number, someone can try likely values, blur them the same way, and compare. A highlighter only tints text, so the words often stay readable.
The cropping catch: keep tools updated and save a new copy
Cropping only protects you if the saved file really drops the cropped area. In 2023, security researchers disclosed a flaw nicknamed aCropalypse in Markup, the screenshot editor on Google Pixel phones. When someone cropped or marked up a screenshot and saved it over the original, leftover data from the original image stayed in the file, and parts of the unedited image could be recovered. A similar flaw then turned up in Snipping Tool on Windows 11 and Snip & Sketch on Windows 10.
Both were fixed. Google released a fix for Pixel phones in a March 2023 security update, and Microsoft released fixed versions of its tools through the Microsoft Store the same month. Files edited with affected versions before the fix can still contain hidden data. The lessons still apply:
- Keep your phone, computer and editing apps up to date.
- Save the edited screenshot as a new file instead of overwriting the original, and check that copy before you share it.
Check for hidden data in the file
- Metadata. Photos taken with a phone camera often carry Exif metadata, which can include the date, time and location where the picture was taken. Screenshots usually carry less of this camera data, but it depends on the device and app. If you're unsure, check the file's details or use a metadata removal tool.
- Edit history. Many photo apps keep the original behind your edits so you can revert them. On iPhone, Apple says that turning on All Photos Data when you share by AirDrop sends the original file with its edit history. Leave it off when you share a redacted screenshot.
How to hide personal information on your device
iPhone
- Press the side button and the volume up button together, or the Home button and the side button on an iPhone with a Home button.
- Tap the screenshot thumbnail if one appears. For an older screenshot, open it in Photos and tap Edit.
- Drag the crop handles to cut away anything you don't need. In Photos, tap the Crop button first.
- Tap the Markup button, tap the Add button, then tap Add Shape and pick a shape such as the square.
- Drag the shape over the detail and resize it. In the Markup toolbar, set a solid fill color and full opacity.
- Tap Done when you're finished, then zoom in on the saved screenshot to check it.
Apple's Markup guide explains the shape options in more detail.
Android
Screenshot tools vary by phone maker, but the approach is the same:
- On most phones, press the Power and Volume down buttons at the same time.
- Use the edit option that appears with the screenshot preview, or open the screenshot later in Google Photos and tap Edit.
- Crop first.
- To cover a detail, use a tool that draws solid color. Google Photos' Markup tools include a pen, a highlighter and text; skip the see-through highlighter. Without a shape tool, crop the detail out or draw over it with the pen until nothing shows.
- Save the result as a copy (in Google Photos, tap Save as copy) and share that copy.
Windows
Snipping Tool on Windows 11 can redact some details automatically. Microsoft's Snipping Tool guide describes the features.
- Press the Windows logo key + Shift + S, or open Snipping Tool and select New. Choose Rectangle or Window mode so you capture only what you need.
- In Snipping Tool, select Text actions, then Quick redact to hide the email addresses and phone numbers it finds. Microsoft says text recognition happens locally on your device.
- For other details, such as names or usernames, use Image crop to cut them out, or use Shapes to draw a rectangle with a solid fill color. Skip the Highlighter.
- Select Save as to save a new copy, and share that copy.
Snipping Tool also saves each capture to your Screenshots folder automatically, so the unredacted original stays there; you can change this in its settings. Quick redact only covers the kinds of text Microsoft names, so check the rest yourself.
Mac
- Press Shift-Command-4 and drag to capture only the area you need. To capture one window, press Shift-Command-4, then the Space bar, and click the window.
- Open the screenshot in Preview and click the Show Markup Toolbar button. Or click the thumbnail that appears in the corner to edit with Markup right away.
- Add a rectangle with the Shapes tool, place it over the detail, and choose a solid Fill Color. Use Crop to cut away edges you don't need.
- In Preview, choose File > Export to save a new copy, and share that copy. Apple notes that once you save an annotated image in Preview, the annotations can no longer be edited, moved or deleted.
Or, in Preview, select the part you want to keep, choose Edit > Copy, then File > New from Clipboard to make a new file with only that area.
Clean removal for tutorials and mockups
A solid box is safe but can look messy in a tutorial, help article or design mockup. EditText.ai's Remove tool detects the text in a screenshot line by line. You tick the lines to remove, such as your email address on a settings screen or a username in a bug report, and the background is rebuilt where the words were. Lines you don't tick stay as they are.
- Upload the screenshot as a PNG, JPG or WebP file up to 14 MiB.
- Tick the detected lines you want to remove, and use Add missing text for any detail that wasn't detected.
- Choose Standard (1 credit) or High quality (2 credits), select Remove selected text, then download the result as a PNG. On a paid plan you can also choose 2K or 4K, where Standard uses 2 or 3 credits and High quality 5 or 7.
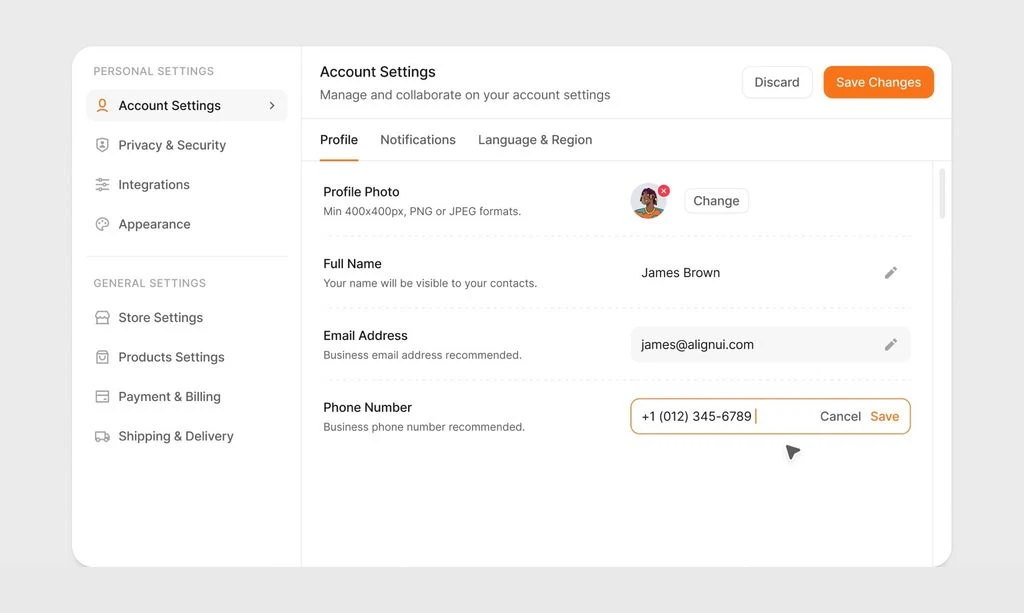
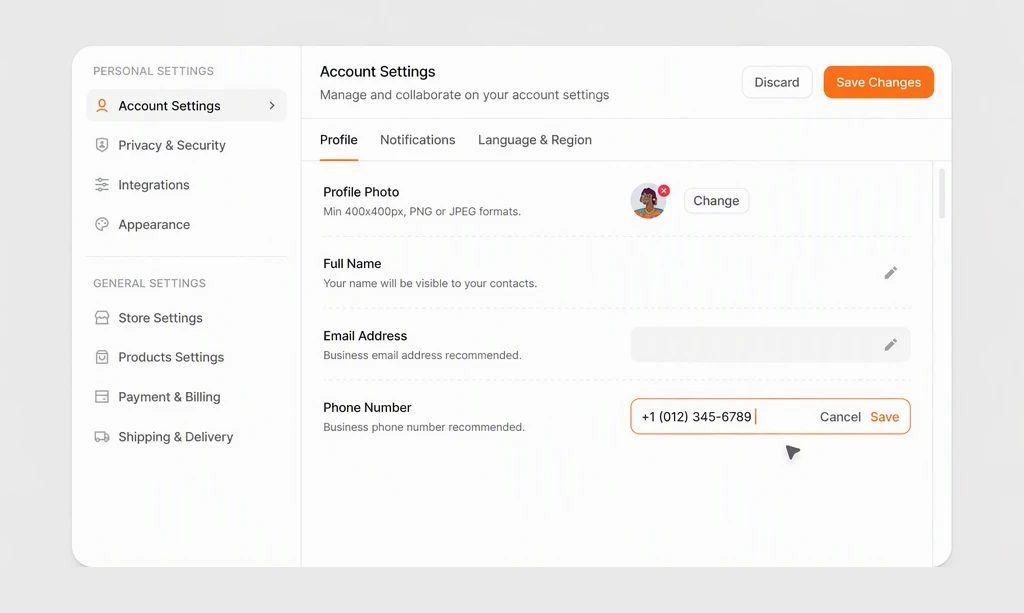
Before and after: a sample name and email address removed from a settings screenshot. The phone number line was left unticked, so it stayed.
Know the trade-off: your screenshot is uploaded for processing. Images are private to your account and saved in My images, but for highly sensitive details such as passwords, recovery codes or account numbers, don't upload the image anywhere; cover them with an opaque box on your own device. Results can vary with detailed backgrounds, so zoom in to check. The one free Standard edit also works for Remove, with a watermark; see pricing for plans.
Working with a photo rather than a screenshot? The same approach can remove text from an image, and the guide on how to remove text from a photo on iPhone or Android covers your phone's built-in erasers.
Use placeholders in mockups and store screenshots
For tutorials, portfolios and app store listings, the safest personal details are ones that were never real. Capture screens from a demo account with sample data, such as the name Alex Sample and an email address at example.com. If you already have a screenshot with real details, you can edit text in a screenshot to swap them for obvious placeholders.
For app store screenshots, set up a demo account before you capture. When you're ready for other markets, you can translate App Store screenshots, and the app store localization guide covers the rest of your listing.
Redact, don't rewrite
Hiding your own details is fine. Changing what a screenshot shows, such as amounts, dates, messages or results, to mislead someone is not. When you use placeholders, make them obviously fake so nobody mistakes them for real information.
Final checklist before you share
- The screenshot is cropped to only what's needed.
- Names, email addresses, phone numbers, addresses, usernames and IDs are covered or removed, including other people's.
- Covers are solid and fully opaque, with no highlighter or light blur on text.
- Notifications, browser tabs, file paths and QR codes have been checked.
- You saved a new copy with up-to-date apps, zoomed in to look for leftovers, and you're sharing that copy.
- The file name doesn't include personal details.
- On iPhone, All Photos Data is off if you share by AirDrop.
Clean up your screenshot
For tutorials, documentation and mockups, EditText.ai can remove text from a screenshot and rebuild the background behind it. Tick the lines to remove, download a PNG, and keep truly sensitive details off the internet by covering them on your own device.
Frequently asked questions
Is it safe to blur personal information in a screenshot?
Not for text. Blur and pixelation keep some information about what was underneath, and short, predictable text such as a phone number or username can sometimes be guessed by blurring likely values and comparing the results. A solid, fully opaque box or a crop removes the information instead, so use one of those for anything private.
How do I redact a screenshot on iPhone?
Tap the screenshot thumbnail right after you take it, or open the screenshot in Photos and tap Edit. Crop away what you don't need, then tap the Markup button, tap the Add button and choose Add Shape. Drag a square over the detail and set a solid fill color with full opacity. Tap Done, then zoom in on the saved image to check it.
Can someone remove a black box from a screenshot?
Not if a fully opaque box is part of the saved image. Once a screenshot is saved as a flat picture, the pixels under the box are replaced. The risks come from elsewhere: sharing a document where the box sits on top of live text, sending the original along with its edit history, or using an editor with a flaw like aCropalypse. Share a fresh copy of the image itself.
How do I remove an email address from a screenshot?
Crop it out if you don't need it, or cover it with a solid box. On Windows 11, Snipping Tool's Text actions include Quick redact, which hides the email addresses and phone numbers it detects. For tutorials or mockups, a text removal tool can delete the address and rebuild the background. If the screenshot also shows anything highly sensitive, cover it on your own device rather than uploading it.
Does a screenshot contain location data?
Usually less than a photo. A photo taken with a phone camera can carry Exif metadata that includes where it was taken, while screenshots generally carry less of that camera data. It varies by device and app, so check the file's details if you're unsure. Location can also be visible in the image itself, for example on a map or in a weather widget.